Showing posts with label Dessert. Show all posts

Sunday, September 4, 2011

Pineapple Fluff Cake Recipe

Please visit our new site at www.CookingMyWay.com


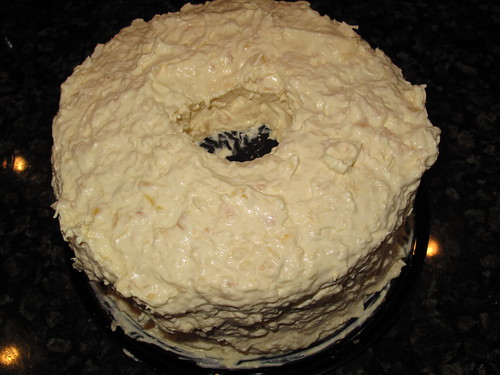
I've seen many recipes for this recipe, but this is the one I like best. Most you will see out there call for cream cheese and milk? I'm not sure if you really need that in this recipe - actually I'd call shenanigans on using them in it... This recipe is super light and tasty. If you want a nice and easy dessert - this is the one to try!

1 Can (20 oz.) Crushed Pineapple, in juice, undrained
1 Pkg (1.5 oz.) JELL-O Vanilla Flavor Fat Free Sugar Free Instant Pudding
1 Tub Lite Cool Whip
1 Angel food cake, cut horizontally into 2 layers
10 Strawberries

Mix pineapple and dry pudding mix in medium bowl with whisk until well blended. Stir in the cool whip. Put bowl in the fridge for 20-30 minutes. Separate the two layers of the angel food cake. Add some of the pineapple mixture to the bottom layer then place the top back on the cake. Use the rest of the mixture to 'ice' the cake. Refrigerate 1 hour. Top with berries just before serving. Eat & Enjoy!

Happy Baking!

~Nikko

--

Monday, August 1, 2011

Oatmeal, Craisins & Walnut Cookies


Please visit our new site at www.CookingMyWay.com


These are my dad's favorite cookies. He doesn't like raisins so I make them with craisins - they are actually a lot better with the craisins!

1 Cup Butter, 2 sticks at room temp
1 Cup White sugar
1 Cup Brown sugar, packed
2 Eggs
1 tsp Vanilla extract
2 Cups all-purpose flour
1 tsp Baking soda
1 tsp Salt
1 1/2 tsp Ground cinnamon
3 Cups Quick cooking oats
2 Cups Craisins
1-2 Cup(s) Walnuts - depends on how much you like them


In a large bowl, cream together white sugar, butter, brown sugar, and vanilla with a wooden spoon or beaters (the easier option). Once that is brought together add the eggs one at a time fully incorporating the first one before you add the second. In another bowl combine the flour, baking soda, salt, and cinnamon. Beat the flour mixture into the creamed mixture in batches. By hand, mix in the oats, Craisins, and walnuts. Cover the dough and put in the fridge for an hour. Preheat the oven to 375 degrees F. Grease your cookie sheet, and place rolled balls of dough about 2 inches apart. Now we like them a bit crispy at my house so I bake them for 15-20 minutes. Normally I would start checking them around 8-10 minutes. After baking, allow the cookies to cool on the baking sheet for 5 minutes then remove to a wire rack to cool completely. Eat & Enjoy...

Happy Baking!

~Nikko

Thursday, July 28, 2011

Strawberry Cheesecake Chocolate Cups


Please visit our new site at www.CookingMyWay.com


Strawberry Cheesecake Chocolate Cups...

This fancy little treat couldn't be any easier. Thanks to my buddy Steve The Tortilla guy I have some fancy Tumaro's Tortillas Chocolate Wraps (you can find these in many stores and if you don't see them - ask the manager to order them in!). I wanted to do something a bit off the reservation with them so I decided to turn the wraps into cups and add a nice filling.

Tumaro's Tortillas Chocolate Wraps, cut into rounds
Philadelphia ready made Cheesecake filling
Strawberries, fresh and quartered (or smaller if desired)

Cut the Tumaro's Tortillas Chocolate Wraps into rounds that will fit into an individual cupcake pan - you will want them smaller than the full cup - maybe to go up about half way. Once you have the pan filled with the rounds bake at 350 for 10-20 minutes, or just until they turn firm. Once the rounds are finished let cool in the pan then remove to a wire rack. Put a few tablespoon fulls of the cheesecake filling into each cup. Top with the strawberries and serve. Eat & Enjoy!

Happy Wrapping!

~Nikko

--

Monday, July 25, 2011

Cheese Danish Recipe


Please visit our new site at www.CookingMyWay.com


So we were on vacation in Clearwater Florida and went to Lenny's for breakfast one morning. Lenny's is known for their breakfasts and some would say the best breakfast available in Florida (or the world). The best part about the breakfast is that you are treated to a nice basket of homemade pastries when you order your food! OMG they are delicious! One of the pastries in our basket was a cheese danish. I decided it was about time for me to try my hand at making them so I went to Ina Garten (she's my go to when it comes to sweets) and got a recipe. I adapted this version a bit from hers...

8 Oz. Cream cheese, at room temp (that's one large box)
1/3 Cup + 2 Tbsp Sugar
2 Extra-Large Egg Yolks, at room temp
2 Tbsp Ricotta cheese
1 tsp Vanilla extract
1/4 tsp kosher salt
1 Tbsp Lemon zest, grated (about 2 lemons) you can use Penzey's lemon zest reconstituted
2 Puff pastry sheets, defrosted
1 Egg beaten with 1 Tbsp water

Put the cream cheese and sugar in a bowl and cream them together gently until smooth. You do not want to do a fast whip on anything here! You can use a mixer to do this or by hand. Once they are creamed nicely, add the egg yolks, ricotta, vanilla, salt, and lemon zest and mix just until combined - do not over work the mixture.

Unfold one sheet of the puff pastry onto a lightly floured surface and roll it out slightly with a floured rolling pin until it's a 10" x 10" square. Cut the sheet into quarters with a knife. Place a heaping tablespoon of the filling into the middle of each square. Brush the border of each square with the egg wash and fold 2 opposite corners to the center - overlap the fold a bit and pinch together well. Brush the top of the pastry with the egg wash. Repeat this step with the remaining pastry sheets. Place the pastries on a parchment lined sheet pan and refrigerate for 20-30 minutes.

While the pastry is in the refer, preheat your oven to 400 degrees F.

Bake the pastries for about 20 minutes, rotating the pan once during baking, until puffed and brown. Eat & Enjoy!

Happy Banking!

~Nikko

--

Video coming soon!


Wednesday, June 29, 2011

Kenny's Key Lime Pie


Please visit our new site at www.CookingMyWay.com


I was at Carmelo's Market in Downtown St. Augustine, FL having when I found these 'mini' key lime pies. I had just had a slice of Carmelo's meat lovers pizza and something sweet sounded good. I would give these a solid B for effort... I thought the filling was nice and tart but the crust was not my favorite. The crust is extremely crumbly and hardly held together. You will need a fork unless you think you can shoot it like a jello shot!


Happy Eating!

~Nikko


Saturday, March 26, 2011

The Apple Tart

Sadly to date the the best thing that I have ever baked besides pizza is nachos... For some reason I have the need to bake an apple tart?!? No specific reason - I'm not even much of a dessert person - I just wanna...

So this is a two part entry - the before and after...

The Before:

I'm told that tarts are not too hard to make at home - that is if you're not the baking blunder that I am.

I've looked at a lot of recipes and they're all pretty close - I've put together the simplest recipe for an apple tart that I could come up with

Ready-made pie crust
Apples
Sugar
Apricot jam
Dark Rum (but I'm not sure on that one yet)

I'm off to the store...

The After:

Well I'm glad to report the tart really wasn't that hard to make. I went as simple as simple could be - With a pre-made pie crust the only real work was processing the apples. It was edible but there's really no way you could make this that it wouldn't be. I was hoping it would be better looking but I'm not done working on mastering this.

What you will need

1 Ready-made pie crust
2 Granny Smith apples, peeled and sliced thin
3 Tb sugar
1/2 Cup apricot jam

Spray a sheet pan with some non-stick spray. Put down your pie crust. Take a fork and poke some holes in the pie crust about every 1-3 inches. Sprinkle 2 tablespoons of the sugar on the bottom of the crust. Add your apples leaving a 1 inch or so border - fan them out and make them look pretty. Roll the border of the crust over the rest of the pie. Will be a bit rustic looking but that's a good thing. Wet with a touch of water and sprinkle the rest of the sugar over the edges and on top of the apples. Bake at 375 for 45 minutes. Remove from the oven and let sit for 5 minutes then move to a rack to cool. Put the apricot jam in a small pan and bring to a boil for 2-3 minutes - you can strain the mixture but I really don't see the need to (some might argue here). Using a pastry brush, put the jam over the crust and apples - you don't have to use it all just make it look all shiny and pretty...


The Next:

My next attempt will be made with a homemade pie crust (which is really easy to do) - I think this will take the tart to a new level. I'm also going to do something to with the apricot glaze. I think this time I might use a spot of the dark rum and before putting it on the tart I'm going to run it through a fine mesh strainer...

Bon Appetit...

~Nikko

--

Tuesday, June 1, 2010

(Ohio State) Buckeyes

I grew up in Ohio with a backyard full of buckeye trees. We got so many buckeyes from the trees that people would come over all the time with pickle buckets to help pick them all up. I've been eating Buckeyes most of my life. Buckeyes are kinda like a Reese's Peanut Butter Cup (my favorite candy)... These are very easy to make and I've never had a hard time getting rid of them once I've had my fill...

2 Cups Peanut butter, smooth kind
1/2 Stick Butter, softened
16oz Box (or bag) Powered sugar

12oz Bag Chocolate chips
2 Tbsp Veggie oil

Use a mixer to beat together the peanut butter and butter. Once well mixed add the powered sugar a bit at a time and mix it all through. Once well mixed roll the mixture into balls about half the size of a golf ball and put on a wax paper lined sheet pan. When finished put the pan in the freezer for one hour. When the hour is up put the chocolate chips in a bowl and add the veggie oil. Microwave on high for 1 minute. Use a spoon to mix the chocolate together - it should be all melted. Use a toothpick to dip the peanut butter balls into the chocolate just far enough to cover 3/4 of the way up. Place them back on the wax paper and use a finger to cover up the hole the toothpick made. Once all the balls have been dunked place the tray into the fridge for 30 minutes. Pack the Buckeyes into a air tight container... Eat & Enjoy!

Cheers,

~Nikko

--

Monday, May 17, 2010

Lemon Poppy Seed Muffins - Made In A KitchenAid Mixer

I'm not much for baking but I have been trying my hand at it more and more lately. I looked at a dozen or so recipes and adapted this one from a few that I liked. This was my first time making these and I found a few things that I would change. The first would be to add more lemon extract to the mix to help bring out the lemon flavor. They tasted good from the first go around, but they could have been more lemony. I added a midge more to the recipe below. I also used the Ferrari (KitchenAid Mixer) to make this batch...

The Stuff:
2 cups all purpose flour
1/2 tsp table salt
1 1/2 tsp baking powder
1/4 tsp baking soda

1/2 cup (1 stick) unsalted butter, softened to room temp
1 cup white granulated sugar
lemon zest from 2 lemons
2 large eggs
2
Tbsp lemon juice
2 tsp pure lemon extract (I got mine from www.penzeys.com )
1 cup sour cream
2 Tbsp poppy seeds

For the glaze:
1
Tbsp lemon juice
1 tsp pure lemon extract
4
Tbsp powdered sugar

Start by preheating your oven to 350 degrees F.

In a medium size bowl whisk together the flour, salt, baking powder, and baking soda in a bowl, and set aside.

In the mixing bowl of your mixer, beat the butter, sugar, and lemon zest, until light and creamy - This will take a few minutes. I started slow at level 2 then moved up to 7. Beat the eggs into the mixture one at a time mixing the first one thoroughly before adding the second. Make sure to scrape down the sides of the bowl at least once during this process. Mix in 1/3 of the flour mixture until just combined - do this gently don't go over level 2. Mix in the lemon juice, extract, and 1/2 of the sour cream until combined.

Add half of the remaining flour mixture, and gently mix until combined. Mix in the remaining sour cream then once combined, mix in the rest of the flour mixture, and the poppy seeds.

You will need to line a muffin tin that will has room for 12 muffins. Put a paper baking cup in each space, and fill to the top with the batter. Bake for 30 minutes, or until golden brown. They will be done when you can insert a toothpick and it comes out clean. Remove from the oven and let sit for 5 minutes - while they are cooling mix the powdered sugar together with the lemon juice and extract to create a thin glaze.

You can either drizzle or brush the lemon glaze over the top of each muffin. You don't have to add this to the muffins, but I like how it looks, and the extra lemon taste...

When cool enough to handle, remove muffins from the tins and cool completely on a rack before serving.


Eat & Enjoy!

Happy Cooking & Eating,

~Nikko

P.S. Next time I make these I'll make a video...

Wednesday, November 25, 2009

Pumpkin Pie


This was voted by some pie aficionados as the best freaking pumpkin pie ever... I'd love to tell you about the years of recipe development that went into the dish but to be honest the recipe came from the back of the pumpkin can... I'm not a pie kinda guy but I have to admit it was fantastic!

3/4 cup sugar
1 tsp cinnamon
1/2 tsp salt - use table salt not kosher
1/2 tsp powdered ginger
1/4 tsp cloves
2 eggs, beaten well
1 can pumpkin
1 can evaporated milk
1 9" pie shell

In a large mixing bowl add the sugar and all the spices. Whisk these together well then add the remaining ingredients (ok not all of them hold out the pie shell). Mix everything together well then pour into a 9" pie shell. Bake at 425 for 25 min then reduce to 350 cook for 40-50 min

Happy Cooking & Eating!

~Nikko

--

Tuesday, August 11, 2009

Haagen-Dazs 5 Ice Cream - The Brown Sugar The Test

I love brown sugar. I always have - I eat it on my oatmeal a few times a week... This love makes it sad to report that I thought the Brown Sugar version of this fantastic ice cream tasted like burnt brown sugar... I took a few extra bites hoping that it would start to taste good but it didn't happen... One of the first times I've had an ice cream I didn't like :(

Bon Appetit...

~Nikko

Monday, August 10, 2009

Tumaro's Chocolate Wraps w/ Cheesecake Filling & Strawberries


Well this treat couldn't be any easier. Thanks to my buddy Steve The Tortilla guy I have some fancy Chocolate Tumaro's Tortillas Wraps. I wanted to do something a bit off the reservation with them and make them into little cups then fill them with goodness.

These were all sorts of good...

They started with a Tumaro's chocolate wrap - I took them and cut them into 4 small rounds (I used a ramekin to make it easier). They were baked in a cupcake pan at 400 for about 10 min. It was amazing to see how the flavor developed once baked - they were amazing. I added a spot of chocolate syrup to the bottoms then I filled them with some cheesecake filling (I bought the Philly pre-made stuff at the market to make it easier). Topped them with some fresh strawberries that I had put a bit of sugar on and let sit for 20 minutes - and done... The only thing I'd change for next time is to make smaller rounds and use a smaller cupcake pan so they were bite sized...

Bon Appetit...

~Nikko

--

Thursday, February 5, 2009

Making Crepes In Paris France...

Is it possible to go to France and not have a sweet or savory delicious Crepe? I'm sure it's possible but We couldn't do it.

We had just finished enjoying the Notre Dame and found a little crepe stand right next door. It was cold day (the day after Thanksgiving 08) and a nice warm Nutella crepe hit the spot!

Here's a clip from start to finish on our crepe... (Not that you probably care but his video was captured using a Canon G10 Point-And-Soot camera)


We're going to do a video recipe of making crepes soon. I make them all the time for my dad who is a bona fide crepe junkie. He likes his with jelly... I like mine with cheese and other good things inside...

Bon Appetit...

~Nikko