Sunday, December 12, 2010

English Muffins The CIA Way


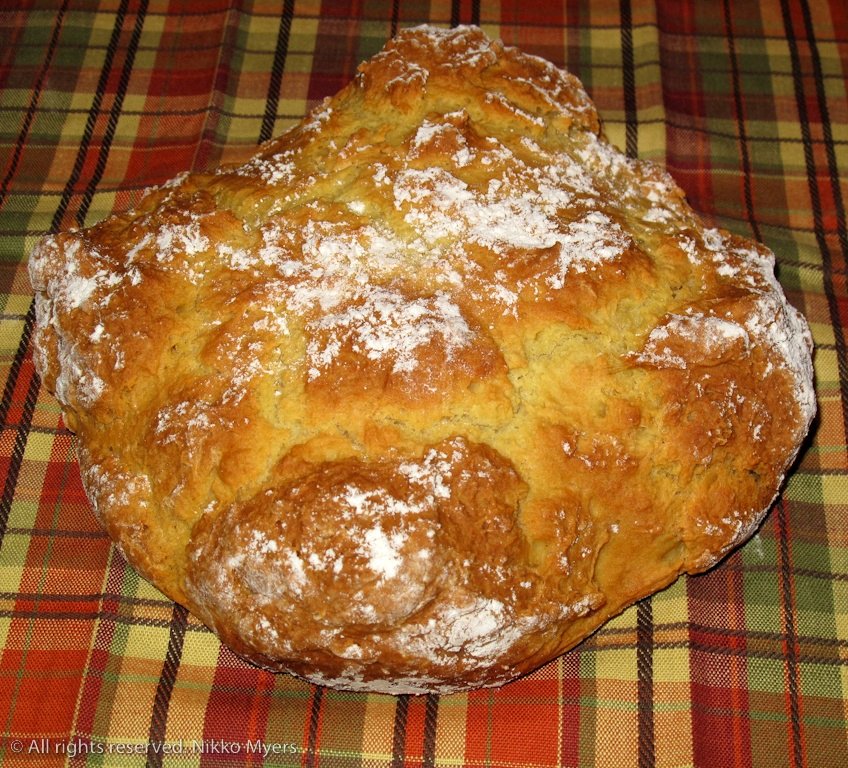
This recipe comes from the acclaimed CIA... It's a pretty easy recipe; one thing to remember - it's a very sticky dough!

1 1/2 teaspoons active dry yeast
1 cup water, warmed to 110F
2 cups all-purpose flour
1 tablespoon unsalted butter, softened
1 teaspoon sugar
1 teaspoon salt
1/4 cup cornmeal, or as needed
Oil or solid vegetable shortening, as needed

Place the yeast and warm water in the bowl of a mixer and stir to completely dissolve. Let the yeast proof until foamy, about 5 minutes. Add the flour, butter, sugar, and salt to the yeast mixture. Mix ingredients together on low speed using the dough hook until all ingredients are blended, about 2 minutes. Increase the speed to medium-high and mix until the dough is smooth, another 5 minutes. Cover with plastic wrap and let the dough rise in a warm place until doubled in size, about 1.5 hours. Fold the dough gently over on itself in three or four places and turn the dough out onto a lightly floured work surface. Divide dough into 12 equal pieces. Shape into rounds. Add the cornmeal to a plate. One at a time put the dough rounds into the cornmeal and coat both sides lightly. Place on a sheet pan that has been heavily dusted with cornmeal. Cover and let rise until slightly risen, about 30 minutes.

Preheat a griddle over medium heat and brush lightly with oil or shortening. Cook the English muffins until lightly brown on the bottom, about 5 minutes. Turn the muffins over and cook until golden brown, another 5 minutes.

Split the English muffins by pulling them apart with a table fork. Toast them just before serving. Serve very hot. Eat & Enjoy!

Cheers,

Nikko

Saturday, December 4, 2010

Turkey Sausage & Apple Stuffing

I have made stuffing before, however it came from my friends at Stove Top... A friend was having an early Thanksgiving Day dinner and I decided it would be a good time to try my hand at some homemade stuffing. Not to toot my own horn but my stuffing kicked booty... Even the picky eaters were shoveling it in.

I had decided that a sausage stuffing would be good. Because of some of the dietary needs I used a nice turkey sausage. For the read I used a whole wheat baguette that came from the local market. The only part of this recipe I looked up is what was in poultry seasoning. Come to find out all you really need is thyme, marjoram, and sage to get a nice flavor rolling. The apple part came on a whim at the market.

2 Whole Wheat Baguettes, cubed about 6-8 cups
5 Turkey Sausage links, casings removed and broken into bite size pieces
1 Golden Apple, diced
2/3 Cup Carrots, diced or sliced
2/3 Cup Red Onion, diced
1 Cup Celery, diced
2 Garlic Cloves, minced
Chicken Stock, enough to make it all nice and moist
2 Tbsp Butter
Thyme
Marjoram
Sage
Shallot Salt
Pepper

In a large saute pan brown the sausage over medium heat until cooked through. While the sausage is cooking cube up the bread and place it in a bowl large enough to mix everything in. Dice the apple and add it to the bread. Dice up the celery, onion, and carrots and reserve in a bowl. Mince the garlic and add to the veg mixture. Once the sausage is done add it to the bread bowl. Melt two tablespoons of butter in the pan you used to cook the sausage over a medium low heat (you can omit this if you don't want to use it. I always say, if it is good without butter it will be better with it...) Once the butter is melted add the veg mixture to the pan. Add a nice pinch of salt and pepper to the mix and stir it in. For the seasoning - I'm going to ask you to add amounts of these that make you happy. Start by adding a heavy pinch of the thyme, marjoram, and sage. Start small and add until it gives you a smell that you like. Once mine started smelling like a nice mix I stopped. I probably ended up with a few teaspoons of each (a little heaver on the thyme but that's just because I love thyme). You will want to cook this for about 5 minutes or just until everything starts to get a bit soft. Once finished add the the bread bowl and mix everything together well. I used almost 4 cups of stock to get everything to a happy moisture. Start by adding two cups and work your way up from there. We are looking for moist not wet. When I was done mixing everything together there was not a puddle of stock on the bottom of the bowl. Once you have a happy mixture, put into a baking dish and bake at 350 for an hour.

Happy Cooking & Eating!

~Nikko

.:.


Wednesday, November 3, 2010

Not Quite Bruschetta...


This is called not quite bruschetta because there's no bread involved - there's cheese... I had an amazing lunch the other day that involved some of the best marinated tomatoes I've ever had (The French Pantry in Jacksonville Fl). I had to see if I could even come close to their amazingness... These turned out really good, but they still need a little work.

2 Cups Roma tomatoes, diced (about 4-6)
Fresh Mozzarella Cheese
1 tsp Oregano, dried
1/4 Cup Basil, either torn or chiffonade
1/4 Cup Olive oil
2 Tbsp White Balsamic vinegar
Salt
Pepper

Thursday, June 17, 2010

Pigs in a Blanket

These always go fast at parties. They don't take long to make or bake...

1 Can Pillsbury Crescent Rolls
1 Pkg Little Smokies

Start by removing the cresent dough from the can. Roll them out onto a cutting board. Use a sharp knife and cut the dough into triangles just big enough to roll around the sausages (see photo above). they don't have to be perfect, and to be honest I'd rather have less than more of the dough with each one. Place on a baking sheet and bake at 375 for 12-15 min or until the dough is bbd... Eay & Enjoy!

Dig The Pig!

~Nikko
--

Monday, June 14, 2010

Sushi - Cucumber Roll


The yin and yang of sushi - Nice cool cucumber and nice spicy wasabi all wrapped up in a little roll...

1 Sheet Nori
1 Cup Sushi rice
1/2 cucumber, peeled, seeded, and cut into long strips
wasabi

Start by cutting your nori in half. put the shiny side down. Spread out a half cup sided ball of sushi rice over the rice. I find that it's easy to roll if you spread the rice all the way to the edges and keep it even.


Once you have your rice spread out, put a line of prepared wasabi down the middle of the rice from side to side. Use as little or as much as you like here. Go easy because they can always add more when they are eating it. Lay down a good quantity of the cucumber right in the middle of the roll.


Use your mat to roll up the roll. Cut into pieces - Eat & Enjoy!


Sushi on!

~Nikko

Thursday, June 10, 2010

The Perfect Guacamole


The Aztecs used to dig on guac before it as fashionable... Oddly enough they referred to the avocado tree as the "testicle tree" - I don't know what the Aztec word for it was but that's what it translated to... The hardest part about making the perfect guacamole is finding the perfect avocado. It's hard these days to find ones that really have that perfect avocado taste. I find that when they are truly in season they taste better. I know you can get them year round but when I was a kid you could only get them around the October to May time frame - tomatoes were generally only available in summer... Food sure has come a long way and it travels a long way so you can eat it all year round. But before I go on a tirade about how much food has become big business around the world let's move back to the guac... I digress, avocados need to give just a bit when you put some pressure on the outside skin. It should bounce back. You can also take off the little stem part and if it's nice and green under there you have a pretty good chance of getting a nice avocado to start with...

I see recipes (and yes I have my own) that give you quantities when making guac and I've come to the conclusion that the best way is to play it by sight. Now a days I look at the mixture and it it seems there is enough to go around - that's what I go with. I want every bite to have some goodness in there.

Avocados
Tomatoes
Red (or sweet) Onion
Jalapeno and or Serrano Peppers
Cilantro
Garlic
Lime juice
Salt
Pepper, fresh cracked please

I start by processing the avocados - slice them in half, remove the seed, and use a spoon to remove from the skin - add to a big bowl. I use two forks to mash them up a bit. I like a chunkier version of guac so I don't turn them into a paste. I dice my tomatoes, onions and add them in - but don't stir until everything is in. Mince the peppers, garlic and chop up the cilantro and add it to the bowl. Squeeze 1 or 2 limes into the bowl add the salt and pepper then mix. You don't want to over mix this so that's why I wait until the end to mix everything in. Taste for seasonings and Eat & Enjoy!

Happy Guacing!

~Nikko

--


P.S. - NEVER EVER USE MAYO IN GUAC!

Monday, June 7, 2010

Sushi - Dragon Roll aka. Caterpillar Roll


This roll will take some skill to make - mainly in the area of thinly slicing and fanning out the avocado on top of the roll... I love this roll mainly because it looks so dang good - it tastes good too but I just love the look. Now you will see that the photo does not jive up with the recipe - The main reason for this is that Lisa doesn't like BBQd eel so I used tempura shrimp inside. It's really dang good with the tempura shrimp...

Nori
Sushi Rice
Tempura Shrimp
1/2 Avocado
Cucumber
Unagi Sauce (Eel Sauce)

You don't quite need a whole sheet of nori for this roll but you will need 3/4ths of one. So sight half the sheet, then half again and cut along that line. Take about a cup ball of sushi rice and spread it over the dull side of the nori. Turn the nori over and put it on a plastic wrap covered rolling mat.

Sushi On!

~Nikko

--

Friday, June 4, 2010

Greek Coleslaw


I had some cabbage that needed used up one day and this is what came out of it. I was going to make some regular coleslaw but I decided to Greek it up a bit - it worked...

2 Cups Cabbage, sliced thin
3 Tbsp White Balsamic
1 Tbsp Penzey's Greek seasoning (www.penzeys.com)
1/2 Cup Feta cheese

In a medium sized bowl, add the balsamic and Penzey's Greek seasoning. Mix together and let sit for a few minutes. In the meantime slice the cabbage thin and crumble the feta cheese. Add them into the bowl and mix well. Eat & Enjoy!

Cheers,

~Nikko

--


Wednesday, June 2, 2010

Tortellini Soup of Goodness


This is a hearty soup that only takes about 10 minutes to make. It's one of my favorites...

3 Cups Whole wheat cheese tortellini, fresh or frozen
4.5 Cups Chicken broth
4 Garlic cloves, minced
1 tsp Sage, dried
1 tsp Thyme, dried
2 Cups Spinach, fresh coarsely chopped
1 16oz can Cannellini beans, rinsed and drained
1/2 Cup Sun-dried tomatoes (or more if you really like them)
Parmesan cheese, grated
Pepper, fresh ground

You can do this all in the same pot but I think it's better to cook the Tortellini in a seperate pot then transfer it to the soup base. I've tried it both ways and doing this works better. So with that said in a pot of salted boiling water cook the tortellini according to the package - do not overcook because it's going to go into the broth. In another large saucepan, bring the broth, garlic, sage, and thyme to a boil. Stir in the spinach, Cannellini beans and tomatoes. Reduce the heat and simmer for about 5 minutes. Add the tortellini and continue to simmer for a few more minutes. Ladel into bowls, sprinkle with the cheese, Eat & Enjoy...

Happy Cooking & Eating!

~Nikko

Tuesday, June 1, 2010

(Ohio State) Buckeyes

I grew up in Ohio with a backyard full of buckeye trees. We got so many buckeyes from the trees that people would come over all the time with pickle buckets to help pick them all up. I've been eating Buckeyes most of my life. Buckeyes are kinda like a Reese's Peanut Butter Cup (my favorite candy)... These are very easy to make and I've never had a hard time getting rid of them once I've had my fill...

2 Cups Peanut butter, smooth kind
1/2 Stick Butter, softened
16oz Box (or bag) Powered sugar

12oz Bag Chocolate chips
2 Tbsp Veggie oil

Use a mixer to beat together the peanut butter and butter. Once well mixed add the powered sugar a bit at a time and mix it all through. Once well mixed roll the mixture into balls about half the size of a golf ball and put on a wax paper lined sheet pan. When finished put the pan in the freezer for one hour. When the hour is up put the chocolate chips in a bowl and add the veggie oil. Microwave on high for 1 minute. Use a spoon to mix the chocolate together - it should be all melted. Use a toothpick to dip the peanut butter balls into the chocolate just far enough to cover 3/4 of the way up. Place them back on the wax paper and use a finger to cover up the hole the toothpick made. Once all the balls have been dunked place the tray into the fridge for 30 minutes. Pack the Buckeyes into a air tight container... Eat & Enjoy!

Cheers,

~Nikko

--

Friday, May 28, 2010

No Need to Knead Bread - The First Attempt


I would love to be a master bread maker, but alas I am nowhere near anything of the such. I am getting better so there is some light at the end of the tunnel - you just have to use binoculars to see it.

I love bread! With the past visit to Paris eating so many types of wonderful bread, I've got the itch to learn how to make bread anyone and everyone would love.

This is cheating but it still makes some amazing bread - so good that I would give it to friends...

The one thing you must have to make this recipe is a heavy 5-Quart or better pot that can withstand a 450F oven. I use an enameled cast iron pot, but a Pyrex or something like that will work too...

3 cups bread flour
1/4 teaspoon instant yeast (yes that is all you need)
1 tsp table salt
1 1/2 cups warm water

Put the flour in a large bowl. Add the yeast and salt to the bowl. You don't have to but I like to mix everything up a bit before I add the water. Add the warm water and mix everything together. You can use your hands for this but I wouldn't - the dough will be very sticky and will stick all over you! Once everything is incorporated you want to cover the bowl with plastic wrap and put it in a draft free place. Let the dough sit for 19 to 24 hours. Use a spatula to dump the dough on a well flowered counter or board. Add flour to your hands and you want to fold the dough over on itself in thirds (like folding a letter). You want to bring in the sides then fold over the top and bottom. Put the seam side down them transfer the dough ball to a bowl lined with a kitchen towel that has been well floured. Pull the towel over the dough then let sit for an hour. When 30 minutes have passed add your pot to the oven and turn it up to 450F. When the hour is up take the pot from the oven and put the dough into the pot. Cover and return to the oven for 30 minutes. When the timer goes off remove the lid from the pot and bake for another 15-20 minutes. Once finished carefully remove the bread from the pot (it will be rocket hot) and let it cool on a rack for at least 1 hour! Do not touch it before the hour is up - I know that's hard to do but it will be worth it... Cut you off a slice and give it a try. It will have a nice smell and great taste... Eat & Enjoy!


Happy baking!

~Nikko

--


Thursday, May 27, 2010

A Lighter Chicken Pot Pie‏

This is a nice lite version of a Chicken Pot Pie... It's very easy to make and you won't miss one bit of the fat!


2 Cups Chicken - Cooked and shredded (I used a rotisserie chicken from the store)
2 Tbsp Butter
2 Cups Mushrooms - Chopped
1/4 Cup Flour
2 Carrots - Chopped
1 Cup Celery - Chopped (Optional)
1 Onion - Diced
2 Cups Chicken Broth
1/2 Cup Fat Free Half & Half
1 Cup Frozen Peas
1 tsp Thyme - Dried
Fresh Parsley - Chopped (just a bit)
2 Cloves Garlic - minced
1 Peppridge Farms Puff Pastry Sheet - Thaw out before using
Salt
Pepper

Start by preheating the oven to 375.

In a large heavy pan or Dutch oven melt the butter over medium head. Add the carrots, onions and garlic - cook until soft. Add the mushrooms, celery (if used), chicken and flour, mix all together well and cook for about 5 minutes. Add the broth and half & half and cook uncovered for 10-15 minutes. Add the seasoning and frozen peas, cook for about 5 minutes. Pour the mixture into a rectangular baking dish. unfold the pastry and stretch to fit and cover the entire baking dish. Cut 2 small vents into the pastry to allow steam to escape. Place in the oven and bake for 25 minutes or until golden brown.

Eat & Enjoy!

Happy Cooking & Eating,

Nikko

--


Monday, May 17, 2010

Lemon Poppy Seed Muffins - Made In A KitchenAid Mixer

I'm not much for baking but I have been trying my hand at it more and more lately. I looked at a dozen or so recipes and adapted this one from a few that I liked. This was my first time making these and I found a few things that I would change. The first would be to add more lemon extract to the mix to help bring out the lemon flavor. They tasted good from the first go around, but they could have been more lemony. I added a midge more to the recipe below. I also used the Ferrari (KitchenAid Mixer) to make this batch...

The Stuff:
2 cups all purpose flour
1/2 tsp table salt
1 1/2 tsp baking powder
1/4 tsp baking soda

1/2 cup (1 stick) unsalted butter, softened to room temp
1 cup white granulated sugar
lemon zest from 2 lemons
2 large eggs
2
Tbsp lemon juice
2 tsp pure lemon extract (I got mine from www.penzeys.com )
1 cup sour cream
2 Tbsp poppy seeds

For the glaze:
1
Tbsp lemon juice
1 tsp pure lemon extract
4
Tbsp powdered sugar

Start by preheating your oven to 350 degrees F.

In a medium size bowl whisk together the flour, salt, baking powder, and baking soda in a bowl, and set aside.

In the mixing bowl of your mixer, beat the butter, sugar, and lemon zest, until light and creamy - This will take a few minutes. I started slow at level 2 then moved up to 7. Beat the eggs into the mixture one at a time mixing the first one thoroughly before adding the second. Make sure to scrape down the sides of the bowl at least once during this process. Mix in 1/3 of the flour mixture until just combined - do this gently don't go over level 2. Mix in the lemon juice, extract, and 1/2 of the sour cream until combined.

Add half of the remaining flour mixture, and gently mix until combined. Mix in the remaining sour cream then once combined, mix in the rest of the flour mixture, and the poppy seeds.

You will need to line a muffin tin that will has room for 12 muffins. Put a paper baking cup in each space, and fill to the top with the batter. Bake for 30 minutes, or until golden brown. They will be done when you can insert a toothpick and it comes out clean. Remove from the oven and let sit for 5 minutes - while they are cooling mix the powdered sugar together with the lemon juice and extract to create a thin glaze.

You can either drizzle or brush the lemon glaze over the top of each muffin. You don't have to add this to the muffins, but I like how it looks, and the extra lemon taste...

When cool enough to handle, remove muffins from the tins and cool completely on a rack before serving.


Eat & Enjoy!

Happy Cooking & Eating,

~Nikko

P.S. Next time I make these I'll make a video...

Tuesday, March 16, 2010

Irish Soda Bread

Irish Soda Bread

I want to be a master bread maker, however history has proven that I suck at making bread. I was looking at bread recipes and thought that Irish Soda Bread would fit into my abilities because there's not much to it. Put it all together, not much kneading, bake, butter, eat - how hard can that be? It turns out to be not hard at all. It was just as easy as the recipe said it was and I'll be dipped if it didn't disappear in a matter of minutes after it cooled and some butter was introduced to it. You'd think people around here hadn't eaten in days the way it went down. I have to admit it was pretty dang good. The next time I don't think I'll cut such a deep cross into it - maybe just 1/2 inch or so. Despite the appearance not being exactly what I wanted the taste was spot on! I'm so freaking happy it turned out, I wanted to raise my fists in the air and run around yelling "I am the Irish Soda Bread Champion" - first time in history I've made bread other than pizza crust I wanted to eat.

3 Cups all purpose flour
1 Tsp salt
1 Tbsp oil
1 Heaping tsp soda, sifted
1 Cup + 2 Tbsp buttermilk
bit of water - maybe 2 tablespoons or so - depends on your dough you want it kinda sticky

Grease and flour a 9-12" round bread pan (maybe 2 - 3" high sides. Put flour in a bowl, add salt and soda - mix well. Make a well in the flour mixture and add the butter milk, and oil. Mix well using a spoon adding a bit of water at a time as needed. This will form a very soft (and sticky) dough. The brilliant thing is that next no kneading is needed. Once the dough has come together turn it out onto your flowered counter. You do want to knead it a few times (really only 5 - 10 times), and roll into a ball. With a sharp knife, cut a deep cross across the top of the dough - about an inch or so deep. Give the top of the bread a quick dusting of flour. Put your dough-ball into the prepared pan - make sure the cross is still prominent in the dough - if not do it again. Bake in a preheated 400 degree oven for 45 minutes. Turn the bread out and let cool on a wire rack. Serve with heaps of butter...

Happy Baking & Bon Appetit...

~Nikko

--

Thursday, January 21, 2010

Homemade Pasta on a Imperia Pasta Machine

Nothing quite says love like homemade pasta. It really doesn't take all that long to do, and it will be better than anything you can buy at the market. My grandmother showed me how to make homemade pasta for the first time when I was about 9.

My grandmother doesn't remember when she got her pasta machine, but knows that the one shes uses is the one shes always had... I got my Imperia pasta machine at Williams-Sonoma. There are a few different types of pasta machines out there - pick the one that makes you happy...


Once you get the machine together it's time to make some pasta! The recipe I use is really easy:

2.25 cups of flour
3 eggs
pinch of salt
1 tablespoon water
1 splash olive oil

Pile the flour on your counter or a cutting board. Make a well in the middle of the flour large enough to hold the eggs, water, and olive oil. Add the eggs, water, and olive oil to your well - scramble the eggs with a fork. Once the eggs are well incorporated start bringing in the flour from the sides of the well. Keep mixing in the flour and when you get to a point where the eggs are not runny anymore you can put up the fork and use your fingers. Bring together the dough and knead for 10 minutes. You will end up with a smooth dough ball. Wrap the dough ball tightly in plastic wrap and let rest for 20 minutes. You can either put it in the fridge or leave it on your counter. Once rested cut your dough ball into four pieces. Working with one at a time, flour the piece and hand form it into a disc. Set your machine on it's widest level and start working the dough through. After each pass, set the machine to the next smallest level. The dough will get thinner and thinner as you go. Once done use the pasta cutter to cut the pasta. You can either hang the pasta or coat it with corn meal and let dry. Bring a gallon of water to boil and salt it well. Boil the pasta until it has a nice bite - about 5 minutes. Sauce the pasta and plate. Eat & Enjoy...

Bon Appetit...

~Nikko

--

Tuesday, January 12, 2010

Foodie Thoughts

I come from a family where gravy is considered a beverage. -- Erma Bombeck

Monday, January 11, 2010

Sushi - How to Make Pickled Ginger - Gari

1 Large piece fresh ginger, thinly sliced
1.5 Cups Rice vinegar
1 Cup Sugar
1 tsp Salt

The first thing you need to do is wash your ginger - it grows in the ground so it can be a bit dirty if they aren't washed before put in the bin. After you have washed your ginger use a spoon to scrape off all the skin - you will waste too much of the ginger if you use a knife. Slice the ginger root as thin as you can and put in a bowl. You can use a vegetable peeler or a mandolin to do your slicing. Add the salt to the ginger slices and mix them well and put in a colander. Let the salted ginger set for an hour. Dry the ginger slices with paper towels and put them in a sterilized container. Mix rice vinegar and sugar in a pan and bring to a boil to dissolve the sugar. Pour the hot sweet vinegar over the ginger slices and let cool. Cover the container and store it in the refrigerator for at least 24 hours. Eat & Enjoy!

Sushi on!

~Nikko

--

Wednesday, January 6, 2010

My World Famous Greek Stuffed Sweet peppers

This is a pretty easy dish to make. I've made this 20 times or so and it's always a hit!

1 LB Ground lamb
Sweet red peppers
2 Cloves garlic, minced
1 Egg
1 tsp Olive oil
1/2 Cup Bread crumbs, I used panko
1 Cup Feta cheese, crumbled
1 tsp Greek Oregano, www.penzeys.com
1 tsp Basil
Salt, pinch
Pepper, pinch

In a medium sized bowl mix everything but the sweet peppers together. Do not over mix this mixture... Once you have a good mix cover and put in the fridge for an hour - this will make the stuffing go a lot easier if you ask me. While your mixture is cooling off prep the peppers - start by cutting off the root end and cleaning out all the seeds. Once this is done wash the peppers in cold water and pat them dry. Take the mixture out of the fridge and using your hands stuff the peppers full. I like to cut off the bottom tip of the peppers just in case there is mega expansion that happens when baking. Put in a baking dish and drizzle a little olive oil over the top of the peppers. Cover with foil and bake at 350 for about an hour. Serve with rice, pasta etc... Eat & Enjoy!

Happy Cooking & Eating!

~Nikko

--