Showing posts with label Pasta. Show all posts

Wednesday, June 2, 2010

Tortellini Soup of Goodness


This is a hearty soup that only takes about 10 minutes to make. It's one of my favorites...

3 Cups Whole wheat cheese tortellini, fresh or frozen
4.5 Cups Chicken broth
4 Garlic cloves, minced
1 tsp Sage, dried
1 tsp Thyme, dried
2 Cups Spinach, fresh coarsely chopped
1 16oz can Cannellini beans, rinsed and drained
1/2 Cup Sun-dried tomatoes (or more if you really like them)
Parmesan cheese, grated
Pepper, fresh ground

You can do this all in the same pot but I think it's better to cook the Tortellini in a seperate pot then transfer it to the soup base. I've tried it both ways and doing this works better. So with that said in a pot of salted boiling water cook the tortellini according to the package - do not overcook because it's going to go into the broth. In another large saucepan, bring the broth, garlic, sage, and thyme to a boil. Stir in the spinach, Cannellini beans and tomatoes. Reduce the heat and simmer for about 5 minutes. Add the tortellini and continue to simmer for a few more minutes. Ladel into bowls, sprinkle with the cheese, Eat & Enjoy...

Happy Cooking & Eating!

~Nikko

Thursday, January 21, 2010

Homemade Pasta on a Imperia Pasta Machine

Nothing quite says love like homemade pasta. It really doesn't take all that long to do, and it will be better than anything you can buy at the market. My grandmother showed me how to make homemade pasta for the first time when I was about 9.

My grandmother doesn't remember when she got her pasta machine, but knows that the one shes uses is the one shes always had... I got my Imperia pasta machine at Williams-Sonoma. There are a few different types of pasta machines out there - pick the one that makes you happy...


Once you get the machine together it's time to make some pasta! The recipe I use is really easy:

2.25 cups of flour
3 eggs
pinch of salt
1 tablespoon water
1 splash olive oil

Pile the flour on your counter or a cutting board. Make a well in the middle of the flour large enough to hold the eggs, water, and olive oil. Add the eggs, water, and olive oil to your well - scramble the eggs with a fork. Once the eggs are well incorporated start bringing in the flour from the sides of the well. Keep mixing in the flour and when you get to a point where the eggs are not runny anymore you can put up the fork and use your fingers. Bring together the dough and knead for 10 minutes. You will end up with a smooth dough ball. Wrap the dough ball tightly in plastic wrap and let rest for 20 minutes. You can either put it in the fridge or leave it on your counter. Once rested cut your dough ball into four pieces. Working with one at a time, flour the piece and hand form it into a disc. Set your machine on it's widest level and start working the dough through. After each pass, set the machine to the next smallest level. The dough will get thinner and thinner as you go. Once done use the pasta cutter to cut the pasta. You can either hang the pasta or coat it with corn meal and let dry. Bring a gallon of water to boil and salt it well. Boil the pasta until it has a nice bite - about 5 minutes. Sauce the pasta and plate. Eat & Enjoy...

Bon Appetit...

~Nikko

--

Thursday, December 10, 2009

Turkey Sausage Fusilli

This is one of the first dishes Lisa cooked for me. She's an amazing cook and I never go hungry... It's hard to believe this is so good given it's so simple, but simple food is usually the best! You can use regular sausage, but if you can find a good turkey sausage why add the extra calories. We get our turkey sausage form Publix - it's the best I've found...

3 Turkey sausage links, casing off and pulled into bite sized pieces
2 Cups Fusilli pasta, the ones that look like corkscrews
2 Red peppers, roasted and diced - can roast them yourself or out of a jar
1/2 Bag Spinach, washed and drained
1/2 Cup Chicken stock
1/4 tsp Red pepper flakes, more or less to your liking
1/2 tsp Oregano
Salt
Pepper

Start by preparing the pasta according to the package. While the pasta is cooking, remove the casings off the sausage and pull them into bite sized pieces. In a large saute pan cook the sausage over a medium heat until it is cooked through. Once the sausage has cooked, remove it to a bowl. Deglaze the pan with the chicken stock. Add the roasted red peppers, red pepper flakes, oregano, salt and pepper to the pan - Cook for 2 minutes. Add the spinach to the pan and cook down - this will take only a few minutes. When the spinach has cooked, add the sausage and drained pasta back to the pan and mix everything together well. Plate, Eat & Enjoy!

Happy Cooking & Eating!

~Nikko

--

Thursday, December 3, 2009

Chicken & Broccoli for One

It was just me eating tonight - I didn't want cereal, and I didn't want to go to the store - So I set out to see what I could find... I found pasta, a chicken breast, broccoli, red onion, and some garlic - I had dinner!

1 Chicken breast, cubed
1/4 Red Onion, chopped
2 Garlic cloves, bashed (skin removed)
1 Cup Broccoli
1 Cup Pasta, or more if you're really hungry
2 Tbsp Olive oil
2 tsp Herbs de Provence
Salt
Pepper

Bring a pot of water to a boil and cook the pasta according to the package. Heat a saute pan to a medium heat and add the olive oil. Let the olive oil come to temperature then add the garlic. Fry the garlic for two minutes to flavor the oil, then remove and discard. Add the onion to the pan with a pinch of salt. Cook for 1 minute. Mix the chicken with the Herbs de Provence then add to the pan. Cook until the chicken is cooked all the way through - about 5 minutes or so. Once the chicken is done cooking add the broccoli and cook until it is tender. If you wish you can add a bit of fresh grated parm. Plate, Eat & Enjoy!

Happy Cooking & Eating!

~Nikko

--

Tuesday, October 27, 2009

Lasagna For Scott...


It's nice to have some loyal fans - I don't have many, but I don't do this for fame and fortune I do it because I love it... Anyhow a little over a year ago I got an email from a viewer telling me how to make better videos - "hey Nikko i love food vids so i'm going to help you make 5 star shows ! have all your veg cut and ready, and cans open other wise we have to sit through you opening cans and going to the garbage can etc. this way we dont lose our mind and get board plus you can make 1 vid instead of 3 or 4 for 1 dish. ps i love the food you make keep them coming a big fan. Scott" Yes I kept the email - I took the advice and it has helped! Even I get bored watching some of the old videos... Although the blog doesn't get a heap of traffic (yet) the videos on YouTube and Vimeo get quite the hits.

Well I asked Scott what he wanted a video of, and he chose Lasagna. I have made lasagna in the past but none of them were much to talk about. I brought in a ringer and I have to say Lisa put the smack down on this lasagna. It was amazing! This is just a cheese lasagna, but you can certainly stuff it with meat if you want. We're going to do another version that is loaded with meat - so check back...

1 Large tub Ricotta cheese
3 Tbsp parsley, chopped fine
1/4 tsp nutmeg
Lasagna noodles
4 Cups mozzarella cheese
1 Cup Parmesan cheese
2 Large eggs, beaten
1 Jar Ragu Organic Sauce (it's the best I've ever tried)
salt
pepper
13x9x2 baking dish
Large bowl to make your cheese mixture

Start by making your cheese mixture - in a large bowl combine the ricotta, 2 cups of the mozzarella, half a cup of the Parmesan cheese, the parsley, pinch of salt and fresh ground pepper, and the beaten eggs (make sure you beat the eggs before you add them to the mixture). Mix everything together well and store in the fridge until ready for use. Cook your lasagna noodles as directed by the package. After you have drained off your noodles, rinse them with cold water. Now it's time to build some goodness! Lay down a thin layer of the sauce in your baking dish - this will help with no sticking. Put down strips of the noodles to cover the bottom of the dish - top evenly with a third of the cheese mixture. Lay down another layer of the pasta however this time lay them the opposite direction - you will need to cut them to fit. You do this to keep the structure sound when you cut the lasagna later it will stay up and not slide all over the place. Put down another layer of sauce then another third of the cheese. Top this layer of the cheese mixture with a little sprinkling of the mozzarella. Add another layer of the pasta and sauce then the remaining cheese mixture. Add your last layer of pasta, a final layer of sauce then the remaining mozzarella and Parmesan cheeses. Cover with tin foil and bake in a preheated 350 degree oven for 30 minutes. Remove the foil and bake for another 5-10 minutes or until lightly browned on top. Cut, plate - Eat & Enjoy...

Bon Appetit...

~Nikko
--

Friday, October 23, 2009

Cipriani Tagliolini - The best out of the box pasta you will ever eat. I beg you to prove me wrong.


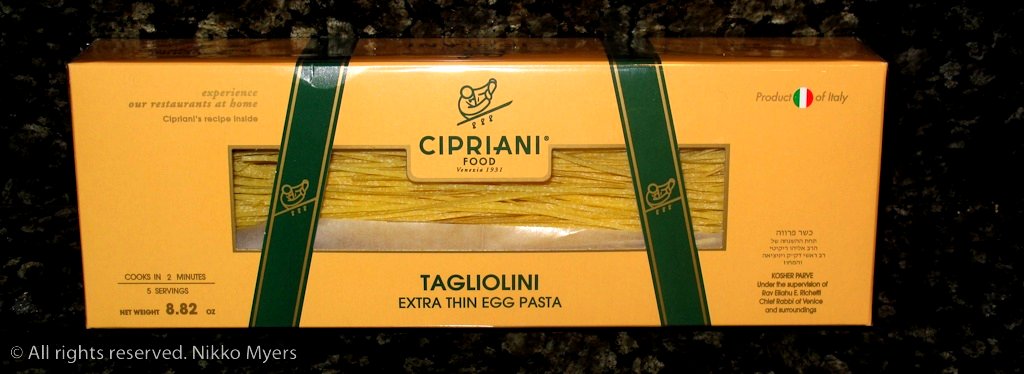
It's my dad's birthday and when I asked him what he wanted to eat he said pasta. I said I would make it from scratch but as always he said don't go to the trouble. There's something very therapeutic to me about making my own pasta. Even though I can make it in my sleep now I'm still mesmerized every time I see my grandmother make pasta (she doesn't even measure anything and it all comes out perfect every time). Anyhow, I was at the market to get some nice bread and cheese for the meal and just happened to look in the pasta isle. The Cipriani pasta box stood right out at me for some reason and after reading the back of the box (see below) I had to try it. Even in the box it looks wonderful.

From this point forward, when I don't have time to make the pasta myself - Cipriani Tagliolini is my go to boxed pasta. It always will be until someone can prove me wrong. Go ahead I challenge you. I triple dog dare you too... I am man enough to say that it is every bit as good as mine is - it's not exactly the same, but it's really close. When it comes to pasta in a box it's freaking amazing!


The box says that it will give you 5 servings - it's not kidding. I had 5 people around the table tonight and I made two boxes just to be sure, we all ate like Kings and Queens and only ate half of the pasta... It only takes a few minutes to cook - You will spend more time bring the water to a boil than you will making the pasta and heating the sauce...


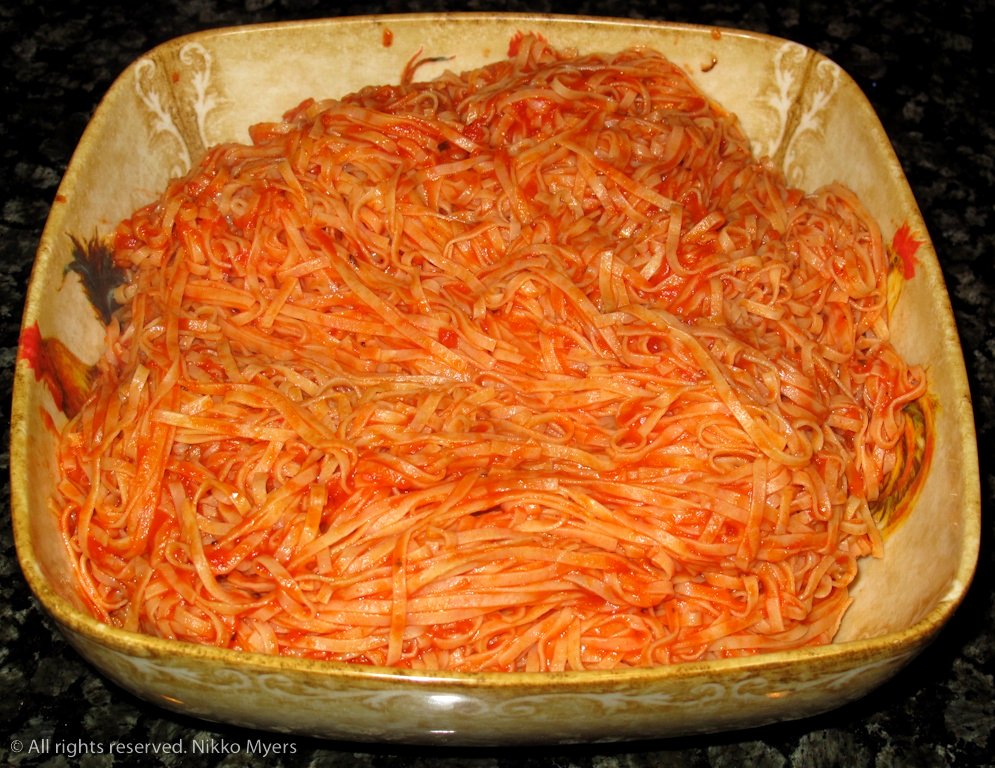
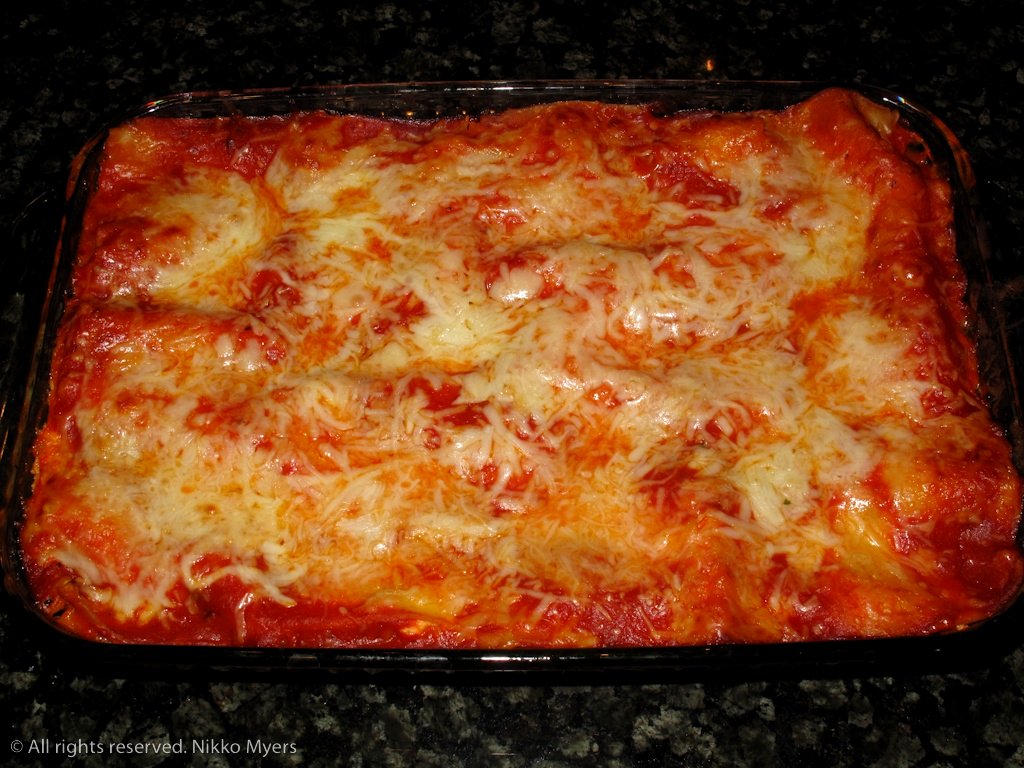
Here's the finished product - I'll admit I was a total slacker tonight - the pasta was out of a box, and I even used sauce out of a jar - If you've never tried Ragu's Organic sauce you're missing out. It's perfect right out of the jar. I had someone once try and doctor it up and to be honest she should have left it well alone - her messing with it made it not as good. Anyway - I'm all for making your own sauce but give the organic version a try and let me know what you think...

Bon Appetit...

~Nikko

From the back of the box!

What makes the Cipriani Pasta Special:
- Seven whole grade A fresh eggs are used for ever kg. of the best durum wheat.
- One hundred times the dough is processed through the press and the cylinders. No other pasta is produced with the same care which makes its thin, delicate but compact texture grow more than any other.
- Sixteen hours the length of time we keep it in a low temperature dryer

In 1931, a long-sought dream became reality. Giuseppe Cipriani opened the doors to Harry's Bar. In a discreet stone building perched along the canal just off Piazza San Marco in Venice, he created a timeless and impeccably appointed establishment. His concept was to serve others like you would want to be served yourself. His vision of luxury in simplicity would touch the soul of people all over the world. At Harry's Bar in Venice, and Italian National Landmark since 2001, all clients are treated like royalty. The secret of Cipriani isn't about what can be seen or touched, but what can be flet and sensed. It's intangible but palpable. It can't be patented, but even after seventy-five years it hasn't been duplicated by others.

I needed a cigarette after I read all that...


Tuesday, April 28, 2009

FoodBuzz Tastemaker: Buitoni Wild Mushroom Agnolotti


I've had some pretty amazing ravioli in my days but the Buitoni Wild Mushroom Agnolotti ranks! As members of the Tastemaker program at Foodbuzz (www.foodbuzz.com), we were sent the Buitoni Wild Mushroom Agnolotti to try, and we're so glad they did! This is an amazing product. The semolina pasta is very thin and has a smooth texture and great bite. The true gem of this product is the pairing of the mushrooms, garlic, and cheeses that makes for an explosion of flavor in every bite.

There are so many amazing things you can do with this pasta. Given it was our first time with this product we decided to go down a very simple road so we could experience the essence of the agnolotti. All we did was sauté the Wild Mushroom Agnolotti in some sage butter. That's right we didn't boil the pasta at all - just right into some butter infused with sage. The agnolotti cooked for about 4 to 5 minutes on each side. All I can say is every single bite made me smile. All I could think of was that I wanted more when my plate was empty - it's just that good.

The next time we make the Wild Mushroom Agnolotti I believe it's going to be simmered in chicken broth with a bit of baby spinach, crispy prosciutto, and maybe some extra mushrooms...

I've tried a few more pastas from Buitoni's Riserva line of pastas and they are all amazing! I'm all for making fresh pasta at home, but if you want a quick 20 minute from start to finish meal - give them a try!

1 Package Buitoni Wild Mushroom Agnolotti
10 or so Sage Leaves chiffinade
3-4 tablespoons of butter

Saute sage in butter for a few minutes. Add the Buitoni Wild Mushroom Agnolotti and cook for 4-5 minutes per side. Plate, eat, & enjoy!

Bon Appetit...

~Nikko

--


Wednesday, April 8, 2009

Baked Pasta

My name is Nikko, and I'm a pastaholic. I could eat pasta every day and not get tired of it. I'm just as happy with only pepper on it as I am with it stuffed with lobster. I've made breakfast dishes out of it (video coming soon) to every kind of topping to stuffing you could probably think of. I love pasta...

I love baked pasta but for some reason I don't make it very often... If you can boil pasta - put sauce on it - cover it with cheese and stick it in the oven - you can make baked pasta. It's just that easy.

Please do not overcook your pasta - waterlogged, mushy pasta is just not good...

In the following video recipe I used:

1 lb Pasta
1 Jar Organic Pasta Sauce
Meatballs
1/2 lb Sliced Mozzarella cheese
Shredded Parmesan cheese

Boil pasta until done - drain - return to pan - add pasta sauce (does not need to be heated) - mix well - put into an oven proof dish - cover with mozzarella - sprinkle on Parmesan - Put under the broiler until the cheese melts and browns a bit...

Eat & Enjoy!

Bon Appetit...

~Nikko

--

Monday, March 2, 2009

Pad Thai


Pad Thai literally means "Thai-style stir-fried noodles". I think it really means "Rice noodles of love...".

If you are using a Pad Thai sauce (like the one I used from CurrySimple www.currysimple.com) this is a very easy dish to make. Without using a pre-made sauce it's a bit more involved.

You would think we were getting paid from them to use their stuff but that's just not true - It's just that good of a product so we like using it!

Anyway - This couldn't be any more simple. Soak your rice noodles in water until they soften. This should take about 20 minutes or so. They will soften in cold water and they won't be starchy like they are when you use hot water. Once your noodles are ready, stir fry up your tofu, chicken, scramble your egg, add the green onions. Add the rice noodles and pour on your Pad Thai sauce (I used about a quarter of a cup but you can use more if you like). Mix all of this well and bring it to temperature. Add your bean sprouts and mix through. Plate up your dish and add chopped roasted and salted peanuts, cilantro, and a wedge of lime. Eat and Enjoy!

1 package rice noodles softened in cold water
1/2 brick of firm tofu cut to your liking
1/2 pound of chicken cut to your liking
3 green onions sliced into bite sized pieces (you can use more if you like)
1 egg - scrambled in the pan
1/4 cup pad thai sauce (from CurrySimple www.currysimple.com)
cilantro
roasted salted peanuts
lime wedges

There are thousands of Pad Thai recipes out there - This one came out really dang good! It was super simple and very tasty without the hassle of making your own Pad Thai sauce...

Bon Appetit...

~Nikko

--

Wednesday, February 25, 2009

CurrySimple Chicken & Pasta Red Curry

I love Thai Curry and I can't get over how easy the CurrySimple products are to use. The only thing I can find that you need to do to them is adjust the heat to your liking. I like HOT Thai food. Don't get me wrong there is a little zing in the package, but I like to add some head to bring it up to my liking. This was a last minute recipe that I came up with and it turned out really good!

1 Lb Chicken cubed (to your liking)
.5 Red onion diced
1 Cup Red, Yellow, & Green peppers diced
1 Cup Snap peas
1 Package CurrySimple Red Curry
Vegetable oil
1 Lb Pasta cooked

Boil pasta according to package, drain and set aside. In a hot pan add a spot of the vegetable oil and work it around the pan. Add the diced chicken and brown. Add the onions and cook for 2 min or so until they start to sweat. Add the diced peppers and warm them through. Add the snap peas and the Curry Simple Red Curry. Cook to temperature. Combine chicken mixture to pasta and toss. Eat & Enjoy!


--

Find more videos like this on iLoveCurrySimple

Wednesday, February 18, 2009

Play With Your Food...

Play With Your Food

I try not to take life too seriously - And you shouldn't either. Sometimes you need to enjoy your food before you consume it. There's really no point other than that I'm trying to get across in this entry, so there you have it...

This dish came from the California Pizza Kitchen - Thai Linguini...

Bon Appetit...

~Nikko