Monday, August 1, 2011

Oatmeal, Craisins & Walnut Cookies


Please visit our new site at www.CookingMyWay.com


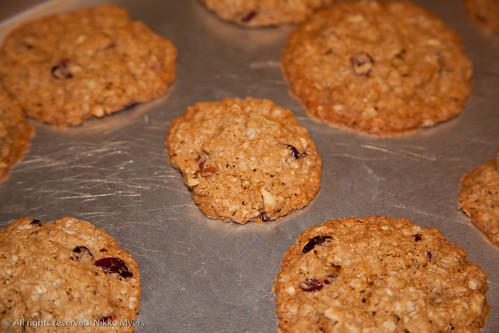
These are my dad's favorite cookies. He doesn't like raisins so I make them with craisins - they are actually a lot better with the craisins!

1 Cup Butter, 2 sticks at room temp
1 Cup White sugar
1 Cup Brown sugar, packed
2 Eggs
1 tsp Vanilla extract
2 Cups all-purpose flour
1 tsp Baking soda
1 tsp Salt
1 1/2 tsp Ground cinnamon
3 Cups Quick cooking oats
2 Cups Craisins
1-2 Cup(s) Walnuts - depends on how much you like them


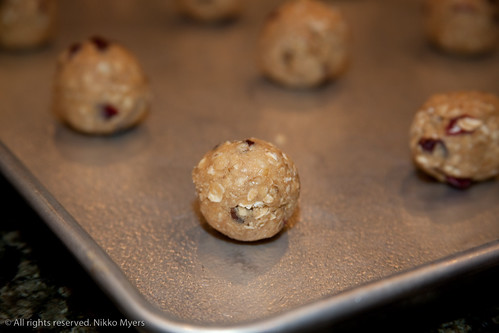
In a large bowl, cream together white sugar, butter, brown sugar, and vanilla with a wooden spoon or beaters (the easier option). Once that is brought together add the eggs one at a time fully incorporating the first one before you add the second. In another bowl combine the flour, baking soda, salt, and cinnamon. Beat the flour mixture into the creamed mixture in batches. By hand, mix in the oats, Craisins, and walnuts. Cover the dough and put in the fridge for an hour. Preheat the oven to 375 degrees F. Grease your cookie sheet, and place rolled balls of dough about 2 inches apart. Now we like them a bit crispy at my house so I bake them for 15-20 minutes. Normally I would start checking them around 8-10 minutes. After baking, allow the cookies to cool on the baking sheet for 5 minutes then remove to a wire rack to cool completely. Eat & Enjoy...

Happy Baking!

~Nikko

Saturday, July 30, 2011

Sausage Dip Recipe


Please visit our new site at www.CookingMyWay.com


This is just what the name says - Sausage Dip. It's not a cheese dip because there's not much cheese in there - It's a Sausage Dip!

1 Tube Hot Sausage, Win Dixie brand works best here
1 Large Onion, diced fine
1 tsp Red Pepper flakes
.5 Box Velveeta Mexican Cheese
.25 Cup Pickled Jalapenos, diced

Heat a saute pan to medium high heat, and add the sausage. Cook the sausage till it's about half way cooked then add the onion, jalapenos, and red pepper flakes. Once the sausage is all browned off, drain off all the fat you can. Return the mixture to the pan and reduce the heat to a medium low. Dice up the Velveeta Mexican Cheese and add it to the pan. Cook stirring well until the cheese is melted. Serve with Tortilla chips. Eat & Enjoy!

Happy Cheesing,

~Nikko

--

Thursday, July 28, 2011

Check out this Story on CHOW.com:


Please visit our new site at www.CookingMyWay.com


Please take a moment and vote for my recipe!!!

Click below :)

Blue Moon No Knead Bread Recipe

Strawberry Cheesecake Chocolate Cups


Please visit our new site at www.CookingMyWay.com


Strawberry Cheesecake Chocolate Cups...

This fancy little treat couldn't be any easier. Thanks to my buddy Steve The Tortilla guy I have some fancy Tumaro's Tortillas Chocolate Wraps (you can find these in many stores and if you don't see them - ask the manager to order them in!). I wanted to do something a bit off the reservation with them so I decided to turn the wraps into cups and add a nice filling.

Tumaro's Tortillas Chocolate Wraps, cut into rounds
Philadelphia ready made Cheesecake filling
Strawberries, fresh and quartered (or smaller if desired)

Cut the Tumaro's Tortillas Chocolate Wraps into rounds that will fit into an individual cupcake pan - you will want them smaller than the full cup - maybe to go up about half way. Once you have the pan filled with the rounds bake at 350 for 10-20 minutes, or just until they turn firm. Once the rounds are finished let cool in the pan then remove to a wire rack. Put a few tablespoon fulls of the cheesecake filling into each cup. Top with the strawberries and serve. Eat & Enjoy!

Happy Wrapping!

~Nikko

--

Monday, July 25, 2011

Cheese Danish Recipe


Please visit our new site at www.CookingMyWay.com


So we were on vacation in Clearwater Florida and went to Lenny's for breakfast one morning. Lenny's is known for their breakfasts and some would say the best breakfast available in Florida (or the world). The best part about the breakfast is that you are treated to a nice basket of homemade pastries when you order your food! OMG they are delicious! One of the pastries in our basket was a cheese danish. I decided it was about time for me to try my hand at making them so I went to Ina Garten (she's my go to when it comes to sweets) and got a recipe. I adapted this version a bit from hers...

8 Oz. Cream cheese, at room temp (that's one large box)
1/3 Cup + 2 Tbsp Sugar
2 Extra-Large Egg Yolks, at room temp
2 Tbsp Ricotta cheese
1 tsp Vanilla extract
1/4 tsp kosher salt
1 Tbsp Lemon zest, grated (about 2 lemons) you can use Penzey's lemon zest reconstituted
2 Puff pastry sheets, defrosted
1 Egg beaten with 1 Tbsp water

Put the cream cheese and sugar in a bowl and cream them together gently until smooth. You do not want to do a fast whip on anything here! You can use a mixer to do this or by hand. Once they are creamed nicely, add the egg yolks, ricotta, vanilla, salt, and lemon zest and mix just until combined - do not over work the mixture.

Unfold one sheet of the puff pastry onto a lightly floured surface and roll it out slightly with a floured rolling pin until it's a 10" x 10" square. Cut the sheet into quarters with a knife. Place a heaping tablespoon of the filling into the middle of each square. Brush the border of each square with the egg wash and fold 2 opposite corners to the center - overlap the fold a bit and pinch together well. Brush the top of the pastry with the egg wash. Repeat this step with the remaining pastry sheets. Place the pastries on a parchment lined sheet pan and refrigerate for 20-30 minutes.

While the pastry is in the refer, preheat your oven to 400 degrees F.

Bake the pastries for about 20 minutes, rotating the pan once during baking, until puffed and brown. Eat & Enjoy!

Happy Banking!

~Nikko

--

Video coming soon!


Wednesday, July 13, 2011

Everything Bagels - St. Augustine, FL


Please visit our new site at www.CookingMyWay.com


They don't do much marketing but the little hand written 'Bagels' signs I see around my office caught my eye. I love a good bagel so I had to stop in and check them out. I'm really glad that I did and now go there a few times a week for breakfast or lunch.


(Bagel selection)

They have a variety of good bagels and flavored cream cheeses (the cucumber-dill is my favorite). The bagels are nice and fresh - they're really good toasted! The BLT on a poppyseed is one of my favorites along with a turkey and brie on the whole wheat!

The staff is very friendly which is very important to me.

(Toasted sesame with scallion cream cheese and bacon!)

Every time I go in there is a good crowd, and I've started noticing some regulars.

I would highly recommend trying Everything Bagels next time you are in the area!

Cheers,

~Nikko

Tuesday, July 12, 2011

Business 2 Blogger

Ever notice that some blogs get all the action? They always have amazing gifts to give their readers and get to try out brand new products. I've done the occasional review, but there are some blogs that are always introducing us to some new things. I just discovered an awesome tool for both bloggers and businesses, it's called Business 2 Blogger - http://www.business2blogger.com . Business owners understand the influence that bloggers can have on their business and this site hooks businesses up with bloggers for FREE! So whether you are a blogger looking to make a few bucks on your writing or you have a business (such as an etsy store owner) that you are trying to advertise, this is the place for you!

Business 2 Blogger


I'm going to give this website a chance and see how I like it. Let me know if you decide to give it a shot and we can share our experiences!

Wednesday, July 6, 2011

Carmelo's Marketplace Pizza - St. Augustine, FL


Please visit our new site at www.CookingMyWay.com


If great service and good food is important to you I'd suggest trying Carmelo's Pizza out next time you're in St. Augustine. My favorite is the Hot Pig (bacon and jalapeƱos) or their Veggie Supreme. The only thing I would add is to make sure and ask them to make sure the crust is crispy!


Wednesday, June 29, 2011

Kenny's Key Lime Pie


Please visit our new site at www.CookingMyWay.com


I was at Carmelo's Market in Downtown St. Augustine, FL having when I found these 'mini' key lime pies. I had just had a slice of Carmelo's meat lovers pizza and something sweet sounded good. I would give these a solid B for effort... I thought the filling was nice and tart but the crust was not my favorite. The crust is extremely crumbly and hardly held together. You will need a fork unless you think you can shoot it like a jello shot!


Happy Eating!

~Nikko


Friday, June 24, 2011

Chicken Shawarma Meatballs

Chicken sawarma is all about the spices and the paper thin cut chicken. I didn't feel like going through the process of cutting up chicken breast, the overnight marination, and trying to roast them correctly, so I decided to make this dish into meatballs and go from there. The process was quite simple and the great flavors of the dish come out in every bite.

1 lb Chicken, minced
1/2 Lemon, juice only
2 Tbsp Greek yogurt
1/4 tsp Allspice
1/4 tsp Cumin
1/4 tsp Cardamom
1/4 tsp Cinnamon
1/2 tsp Paprika
dash Nutmeg
1/2 tsp Salt
pepper

Pita Bread
Tzatziki Sauce (video on this site)
Lettuce
Onion
Tomato

Add the minced chicken to a large bowl. Squeeze in the lemon, and add the yogurt and spices. Mix everything together until well incorporated. Cover with plastic wrap, and let sit in the firdge for at least an hour (a few hours would be better). With moist hands, take a heaping tablespoon of the chicken mixture and roll into a ball (about the size of the golf ball). Place on a cooking sheet a few inches apart. Place the cooking sheet under the broiler for 10 minutes. Remove and turn the meatballs over and place under the broiler for another 10 minutes. Remove from the oven and let rest under a foil tent for 10 minutes. To build your sandwich - put down the pita bread and spread on some tzatziki sauce, add 4/5 of your chicken shawarma meatballs, then lettuce, tomato, and onion. Eat & Enjoy!

Happy Cooking!

~Nikko

--


Thursday, June 23, 2011

Pumpkin Spice Muffins


I've been wanting to bake something with pumpkin since carving my little sisters Halloween pumpkin this year. I looked at a few different recipes and couldn't find anyting that really jumped out at me. I took a few different recipes and put them together to create this recipe. They came out really dang good - I hope you try them and like them as well as we did...

The Dry Stuff:
3 Cups Bread flour
1 1/2 tsp Baking powder
1 tsp Baking soda
1 tsp Salt, table
3/4 tsp Cinnamon
1/2 tsp Nutmeg
1/2 tsp Ginger
1/2 tsp Cloves

The Wet Stuff:
2 Cups Sugar
3 Eggs
1 1/2 Cups Pumpkin, roasted and mashed, or 1 can
1/2 Cup Water
1/4 Cup Vege oil
1/4 Cup Butter, melted

The Optional Stuff (but highly recommended):
1 Cup Pecans, chopped

In a bowl add all the dry stuff and use a whisk to blend it all together - set aside. In the bowl of an electric mixer, add the wet stuff and mix for a minute or so until it is well mixed. Slowly add the flour mixture to the wet mixture and combine until well incorporated. Stir in the nuts.

Cover the batter and allow to sit at room temp for 30 min to an hour.

Preheat the oven to 400 F

Put muffin cups into the muffin tray and fill 2/3 full. Bake for 15-20 minutes or until a toothpick (or knife) comes out clean. Cool on a wire rack. Eat & Enjoy!

Happy Baking!

Nikko

--


Monday, March 28, 2011

White Chicken Chili


This is a dish so easy even my dad can make it (and that's saying a lot!). The thing I like most about white chicken chili is that it's so light. It's rich and filling but not as heavy as regular chili...

1 LB Chicken, diced
1 tsp oil
1 Box Chicken broth
2 Garlic cloves, minced
Chili powder
Cumin powder
Adobo Seasoning
2 16oz can Cannelloni beans, rinsed and drained
1 can Hatch Chilies, diced
1 Avocado, diced
Cilantro
Salt
Pepper, fresh ground
Tortilla strips

Heat the oil in a stock pot and heat to a medium high. Add a few tablespoons of chili powder, 1 tablespoon of the cumin and adobo seasoning and mix (you can adjust for taste later) to the chicken mix well and add to the pot - cook for 5 min or until done. Add the garlic and cook for 1 minute. Add the Hatch chilies and Cannelloni beans - mix well. Add the stock and simmer for 10 minutes. Ladel into bowls, add some tortilla strips, avocado, and cilantro. Eat & Enjoy...

~Nikko

--

Saturday, March 26, 2011

The Apple Tart

Sadly to date the the best thing that I have ever baked besides pizza is nachos... For some reason I have the need to bake an apple tart?!? No specific reason - I'm not even much of a dessert person - I just wanna...

So this is a two part entry - the before and after...

The Before:

I'm told that tarts are not too hard to make at home - that is if you're not the baking blunder that I am.

I've looked at a lot of recipes and they're all pretty close - I've put together the simplest recipe for an apple tart that I could come up with

Ready-made pie crust
Apples
Sugar
Apricot jam
Dark Rum (but I'm not sure on that one yet)

I'm off to the store...

The After:

Well I'm glad to report the tart really wasn't that hard to make. I went as simple as simple could be - With a pre-made pie crust the only real work was processing the apples. It was edible but there's really no way you could make this that it wouldn't be. I was hoping it would be better looking but I'm not done working on mastering this.

What you will need

1 Ready-made pie crust
2 Granny Smith apples, peeled and sliced thin
3 Tb sugar
1/2 Cup apricot jam

Spray a sheet pan with some non-stick spray. Put down your pie crust. Take a fork and poke some holes in the pie crust about every 1-3 inches. Sprinkle 2 tablespoons of the sugar on the bottom of the crust. Add your apples leaving a 1 inch or so border - fan them out and make them look pretty. Roll the border of the crust over the rest of the pie. Will be a bit rustic looking but that's a good thing. Wet with a touch of water and sprinkle the rest of the sugar over the edges and on top of the apples. Bake at 375 for 45 minutes. Remove from the oven and let sit for 5 minutes then move to a rack to cool. Put the apricot jam in a small pan and bring to a boil for 2-3 minutes - you can strain the mixture but I really don't see the need to (some might argue here). Using a pastry brush, put the jam over the crust and apples - you don't have to use it all just make it look all shiny and pretty...


The Next:

My next attempt will be made with a homemade pie crust (which is really easy to do) - I think this will take the tart to a new level. I'm also going to do something to with the apricot glaze. I think this time I might use a spot of the dark rum and before putting it on the tart I'm going to run it through a fine mesh strainer...

Bon Appetit...

~Nikko

--

Sunday, December 12, 2010

English Muffins The CIA Way


This recipe comes from the acclaimed CIA... It's a pretty easy recipe; one thing to remember - it's a very sticky dough!

1 1/2 teaspoons active dry yeast
1 cup water, warmed to 110F
2 cups all-purpose flour
1 tablespoon unsalted butter, softened
1 teaspoon sugar
1 teaspoon salt
1/4 cup cornmeal, or as needed
Oil or solid vegetable shortening, as needed

Place the yeast and warm water in the bowl of a mixer and stir to completely dissolve. Let the yeast proof until foamy, about 5 minutes. Add the flour, butter, sugar, and salt to the yeast mixture. Mix ingredients together on low speed using the dough hook until all ingredients are blended, about 2 minutes. Increase the speed to medium-high and mix until the dough is smooth, another 5 minutes. Cover with plastic wrap and let the dough rise in a warm place until doubled in size, about 1.5 hours. Fold the dough gently over on itself in three or four places and turn the dough out onto a lightly floured work surface. Divide dough into 12 equal pieces. Shape into rounds. Add the cornmeal to a plate. One at a time put the dough rounds into the cornmeal and coat both sides lightly. Place on a sheet pan that has been heavily dusted with cornmeal. Cover and let rise until slightly risen, about 30 minutes.

Preheat a griddle over medium heat and brush lightly with oil or shortening. Cook the English muffins until lightly brown on the bottom, about 5 minutes. Turn the muffins over and cook until golden brown, another 5 minutes.

Split the English muffins by pulling them apart with a table fork. Toast them just before serving. Serve very hot. Eat & Enjoy!

Cheers,

Nikko

Saturday, December 4, 2010

Turkey Sausage & Apple Stuffing

I have made stuffing before, however it came from my friends at Stove Top... A friend was having an early Thanksgiving Day dinner and I decided it would be a good time to try my hand at some homemade stuffing. Not to toot my own horn but my stuffing kicked booty... Even the picky eaters were shoveling it in.

I had decided that a sausage stuffing would be good. Because of some of the dietary needs I used a nice turkey sausage. For the read I used a whole wheat baguette that came from the local market. The only part of this recipe I looked up is what was in poultry seasoning. Come to find out all you really need is thyme, marjoram, and sage to get a nice flavor rolling. The apple part came on a whim at the market.

2 Whole Wheat Baguettes, cubed about 6-8 cups
5 Turkey Sausage links, casings removed and broken into bite size pieces
1 Golden Apple, diced
2/3 Cup Carrots, diced or sliced
2/3 Cup Red Onion, diced
1 Cup Celery, diced
2 Garlic Cloves, minced
Chicken Stock, enough to make it all nice and moist
2 Tbsp Butter
Thyme
Marjoram
Sage
Shallot Salt
Pepper

In a large saute pan brown the sausage over medium heat until cooked through. While the sausage is cooking cube up the bread and place it in a bowl large enough to mix everything in. Dice the apple and add it to the bread. Dice up the celery, onion, and carrots and reserve in a bowl. Mince the garlic and add to the veg mixture. Once the sausage is done add it to the bread bowl. Melt two tablespoons of butter in the pan you used to cook the sausage over a medium low heat (you can omit this if you don't want to use it. I always say, if it is good without butter it will be better with it...) Once the butter is melted add the veg mixture to the pan. Add a nice pinch of salt and pepper to the mix and stir it in. For the seasoning - I'm going to ask you to add amounts of these that make you happy. Start by adding a heavy pinch of the thyme, marjoram, and sage. Start small and add until it gives you a smell that you like. Once mine started smelling like a nice mix I stopped. I probably ended up with a few teaspoons of each (a little heaver on the thyme but that's just because I love thyme). You will want to cook this for about 5 minutes or just until everything starts to get a bit soft. Once finished add the the bread bowl and mix everything together well. I used almost 4 cups of stock to get everything to a happy moisture. Start by adding two cups and work your way up from there. We are looking for moist not wet. When I was done mixing everything together there was not a puddle of stock on the bottom of the bowl. Once you have a happy mixture, put into a baking dish and bake at 350 for an hour.

Happy Cooking & Eating!

~Nikko

.:.


Wednesday, November 3, 2010

Not Quite Bruschetta...


This is called not quite bruschetta because there's no bread involved - there's cheese... I had an amazing lunch the other day that involved some of the best marinated tomatoes I've ever had (The French Pantry in Jacksonville Fl). I had to see if I could even come close to their amazingness... These turned out really good, but they still need a little work.

2 Cups Roma tomatoes, diced (about 4-6)
Fresh Mozzarella Cheese
1 tsp Oregano, dried
1/4 Cup Basil, either torn or chiffonade
1/4 Cup Olive oil
2 Tbsp White Balsamic vinegar
Salt
Pepper

Thursday, June 17, 2010

Pigs in a Blanket

These always go fast at parties. They don't take long to make or bake...

1 Can Pillsbury Crescent Rolls
1 Pkg Little Smokies

Start by removing the cresent dough from the can. Roll them out onto a cutting board. Use a sharp knife and cut the dough into triangles just big enough to roll around the sausages (see photo above). they don't have to be perfect, and to be honest I'd rather have less than more of the dough with each one. Place on a baking sheet and bake at 375 for 12-15 min or until the dough is bbd... Eay & Enjoy!

Dig The Pig!

~Nikko
--

Monday, June 14, 2010

Sushi - Cucumber Roll


The yin and yang of sushi - Nice cool cucumber and nice spicy wasabi all wrapped up in a little roll...

1 Sheet Nori
1 Cup Sushi rice
1/2 cucumber, peeled, seeded, and cut into long strips
wasabi

Start by cutting your nori in half. put the shiny side down. Spread out a half cup sided ball of sushi rice over the rice. I find that it's easy to roll if you spread the rice all the way to the edges and keep it even.


Once you have your rice spread out, put a line of prepared wasabi down the middle of the rice from side to side. Use as little or as much as you like here. Go easy because they can always add more when they are eating it. Lay down a good quantity of the cucumber right in the middle of the roll.


Use your mat to roll up the roll. Cut into pieces - Eat & Enjoy!


Sushi on!

~Nikko

Thursday, June 10, 2010

The Perfect Guacamole


The Aztecs used to dig on guac before it as fashionable... Oddly enough they referred to the avocado tree as the "testicle tree" - I don't know what the Aztec word for it was but that's what it translated to... The hardest part about making the perfect guacamole is finding the perfect avocado. It's hard these days to find ones that really have that perfect avocado taste. I find that when they are truly in season they taste better. I know you can get them year round but when I was a kid you could only get them around the October to May time frame - tomatoes were generally only available in summer... Food sure has come a long way and it travels a long way so you can eat it all year round. But before I go on a tirade about how much food has become big business around the world let's move back to the guac... I digress, avocados need to give just a bit when you put some pressure on the outside skin. It should bounce back. You can also take off the little stem part and if it's nice and green under there you have a pretty good chance of getting a nice avocado to start with...

I see recipes (and yes I have my own) that give you quantities when making guac and I've come to the conclusion that the best way is to play it by sight. Now a days I look at the mixture and it it seems there is enough to go around - that's what I go with. I want every bite to have some goodness in there.

Avocados
Tomatoes
Red (or sweet) Onion
Jalapeno and or Serrano Peppers
Cilantro
Garlic
Lime juice
Salt
Pepper, fresh cracked please

I start by processing the avocados - slice them in half, remove the seed, and use a spoon to remove from the skin - add to a big bowl. I use two forks to mash them up a bit. I like a chunkier version of guac so I don't turn them into a paste. I dice my tomatoes, onions and add them in - but don't stir until everything is in. Mince the peppers, garlic and chop up the cilantro and add it to the bowl. Squeeze 1 or 2 limes into the bowl add the salt and pepper then mix. You don't want to over mix this so that's why I wait until the end to mix everything in. Taste for seasonings and Eat & Enjoy!

Happy Guacing!

~Nikko

--


P.S. - NEVER EVER USE MAYO IN GUAC!

Monday, June 7, 2010

Sushi - Dragon Roll aka. Caterpillar Roll


This roll will take some skill to make - mainly in the area of thinly slicing and fanning out the avocado on top of the roll... I love this roll mainly because it looks so dang good - it tastes good too but I just love the look. Now you will see that the photo does not jive up with the recipe - The main reason for this is that Lisa doesn't like BBQd eel so I used tempura shrimp inside. It's really dang good with the tempura shrimp...

Nori
Sushi Rice
Tempura Shrimp
1/2 Avocado
Cucumber
Unagi Sauce (Eel Sauce)

You don't quite need a whole sheet of nori for this roll but you will need 3/4ths of one. So sight half the sheet, then half again and cut along that line. Take about a cup ball of sushi rice and spread it over the dull side of the nori. Turn the nori over and put it on a plastic wrap covered rolling mat.

Sushi On!

~Nikko

--